Battery System Component Overview
If you're just getting started with building your truck, van or RV's electrical system all of the new terminology and equipment can be a little overwhelming. This guide covers the most common components used when building an electrical system for a truck, van or RV - DC-DC chargers, solar chargers, inverters and more.
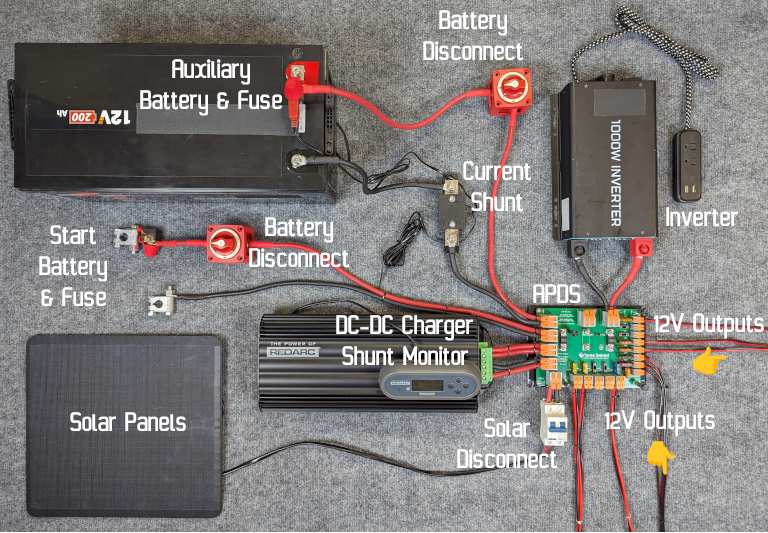
Here is one example of an electrical system that can be used to power a 12V fridge, lights, and other gear. This system uses a Redarc Manager30 charger which combines several different functions, greatly simplifying the wiring involved. The Auxiliary Power Distribution System (APDS) routes most of the connections between components and outputs power to all of the accessories and equipment. Any other dual input DC-DC charger will be wired up similarly to what is seen here (check out our wiring diagrams for more examples). This is just a demonstration so only critical equipment is shown, we left the full solar array, outputs, and actual start battery out of the picture to simplify things a bit. Take a quick look and we'll walk you through everything step by step. We'll also cover a few items we didn't need to use here, such as bus bars.
Start Battery
Your vehicle's primary electrical system (start battery and alternator) will be used to charge the auxiliary battery system while the engine is running. With the exception of your DC-DC charger - we'll get to that in a minute - whether you connect your equipment to your primary or auxiliary system greatly depends on how you use your vehicle as well as your specific equipment. For example: if you have a high-power light bar or air compressor that you only use while the vehicle is running it might make more sense to connect it to your primary system, especially if your auxiliary battery is located inside the vehicle and wiring it to that would use a lot of cable. A fridge or camp light by contrast should never be connected to your start battery as those will run for long periods of time when the vehicle is off.
Rule of thumb: if you use it when the rig is off, don't connect it to your primary system and put it on the auxiliary system instead. Start batteries are optimized for starting your engine and not for running things for long periods of time. Doing so can drain or damage them and leave you stranded.
Auxiliary Battery
The auxiliary battery will be used to power everything you need while parked and the engine isn't running. Figuring out what size battery or battery bank you need is more art than science and depends on your style of camping, location and ability to use solar, shore power availability, amount you drive, and much more.
The two main types of batteries used for this application are Absorbent Glass Mat (AGM) and Lithium (usually LiFePO4). These batteries are both specifically designed to deeply discharge over long periods of time (deep-cycle) but do have a few differences:
- Cost: Lithium batteries are quite a bit more expensive than AGM
- Lifespan: Lithium degrades less with each charge/discharge cycle and holds up better over long periods of time
- Weight: AGM batteries contain lead and are much, much heavier than Lithium. Since you generally want to keep the center of gravity of your vehicle as low as possible this may limit your ability to put the batteries somewhere convenient
- Capacity: Lithium batteries can be run until nearly flat, AGM batteries will usually be damaged if repeatedly discharged below 50%. For any given battery rating the AGM battery will effectively have half the usable energy
- Temperature: Lithium generally cannot be charged below freezing, though some newer batteries have built in heating
- Water: AGM can be mounted externally (under hood or in a box outside). Lithium cannot
- Charger Compatibility: Less an issue these days but some chargers aren't compatible with Lithium. More something to be aware of when buying a DC-DC charger
Fuses
Fuses should always be installed to protect your system in case of a short circuit. They should be placed as closed to the battery as reasonably possible. In the picture above they are attached directly to the positive battery terminal of the auxiliary battery and directly to the battery terminal connector that attaches to the start battery. Marine Rated Battery Fuse (MRBF) terminal blocks provide a compact method of adding a fuse to your battery as they are able to be installed directly on many battery terminals. An alternative is an inline MIDI fuse but this requires an extra section of cable with cable lugs between the fuse holder and battery.
Circuit breakers can be used in place of fuses. The Blue Sea 187 series is also rated for use as a switch which can be very convenient if space is limited.
Battery Disconnect Switches
Exactly what it says on the label. These let you easily power down the system to work on or put into storage. Disconnect switches should be placed after the battery fuse but before anything else in the system. You will probably want one for both the start and auxiliary batteries.
Current Shunt and Battery Monitor
A current shunt is how you monitor what's going on with your battery. The current shunt is usually placed in line with the negative battery terminal and can "see" all of the current flowing in or out of the battery. Your battery monitor will connect to the shunt (as well as directly the battery to power itself) and will at minimum display readings showing whether the battery is charging, discharging, and at what rate. More advanced monitors show total/used battery capacity as well as the ability to show charge and discharge rates over time so you can see how effectively your solar panels are working and things like that.
In the picture above, the current shunt is in line with the negative battery terminal. Instead of a standalone battery monitor the Manager30 has one directly integrated so the shunt just connects to a data input on the charger. Battery status and other information is shown on the main charger display.
Bus Bars
A bus bar's job is to distribute electricity along a shared path. They're usually just a piece of conductive metal mounted to plastic or some other type of non-conductive material. Cables with lugs are screwed down or bolted to the bus bar. If fuses need to be installed they will need to be placed in line with the wire or cable as bus bars typically do not provide any way to add fuses. Our 75A x 6 bus bar is a little different in that it uses Wago connectors which don't require cable lugs.
Fuse Blocks
Fuse blocks are used to distribute electricity to equipment with fuses in line to protect the wiring. They typically have one or two large connections which go to the battery or other current source, and several smaller connections which go to your equipment. Some fuse blocks only provide a positive connection and require a bus bar for the negative connections. Our 75A In / 10 x 20A Out Distribution Block and 40A In / 5 x 20A Out Distribution Block are examples of fuse blocks.
Auxiliary Power Distribution System
The Auxiliary Power Distribution System is a bus bar and fuse block in one. All of the main connections route through the APDS to make everything very straightforward to wire up, just plug in your start battery, auxiliary battery, charger(s) and all equipment running off your auxiliary battery into the labeled connectors.
Other similar products are the Redarc TVMS Prime (which offers load switching capability) and Egon DC Hub.
DC-DC Charger
A DC-DC charger is used to take power from the primary electrical system of your vehicle and supply it to the auxiliary electrical system. Lithium and AGM batteries charge at different voltages from what your alternator may output. Using a DC-DC charger isolates the systems from each other and allows you to run the auxiliary system at a voltage appropriate for the batteries. Chargers also provide different charge "profiles" to better charge and maintain both AGM and Lithium battery types as well as prevent overcharging.
Some guides, diagrams, forums, etc may recommend using a battery isolator instead of a DC-DC charger. This is outdated advice and will not work well with late-model vehicles and deep-cycle batteries available today.
Solar Charger
A solar charger is used to take the variable voltage produced by your solar panels and turn that into an output that will efficiently charge your battery. There are two types of solar chargers: PWM and MPPT. PWM chargers can be inexpensive but MPPT chargers are between 5-30% more efficient. We recommend using a MPPT charger for your vehicle.
Solar chargers can be integrated directly with DC-DC chargers as in the Manager30 shown above. We recommend using a dual input DC-DC charger which can handle both your solar panels as well as start battery/alternator connection.
Solar Disconnect Switch
Similarly to the battery disconnect switch this lets you safely power down the system to work on or put into storage. It also provides circuit protection in case your solar panels are outputting more current than the system can handle. Switches are available from a variety of online retailers and are quite inexpensive. Unlike other switches these will provide connections for both the positive and negative terminals.
Inverter
Your auxiliary battery outputs 12 volts direct current (DC) but anything that would plug into a wall socket at your house is going to want 110 or 220 volts of alternating current (AC). An inverter is a device that takes the 12V DC from your battery and turns it into 110/220V AC. This conversion isn't free though, depending on your inverter some percentage of power will be lost. When possible we recommend using devices that can run off DC instead of AC. For example, if you have a laptop that can charge via USB-C then it will be more efficient (and frankly easier) to charge your laptop with a 100W USB-C charger powered directly from the battery than it would be to plug the power brick into your inverter with the inverter running off the battery.
Shore Power and Power Converters
Basically the opposite of an inverter, this takes 110/220V AC "shore power" from an RV pad or other power outlet and turns it into 12V DC to run your gear and charge your batteries. Some units such as the Victron MultiPlus integrate both a shore power charger and an inverter in one unit.